以前看到这个论坛程序的名字时,总是不由自主的联想起这么一句话:you can you up no can no bb。。。
NodeBB是一套非常完善的论坛系统,经过几年的更新迭代,现在的功能基本可以满足大部分用户的需求。NodeBB的论坛风格其实类似于Discourse,但实际上我个人更喜欢NodeBB,因为它比Discourse轻量,部署也非常方便。在国际化支持方面也比Discourse要好。
NodeBB的官方论坛/演示站:https://community.nodebb.org/
NodeBB官方有非常详细的Docs,遇到问题可以先看这里:https://docs.nodebb.org/
我基本上第一次部署的时候也是照着官方的文档来的,不过多多少少还是有点小坑,这里记录一下符合我自己使用习惯的部署方法。
首先准备:
1.一台VPS,安装CentOS7 X64。
2.一个域名解析到VPSIP。
首先更新系统:
yum -y update
安装EPEL源:
yum -y install epel-release
安装开发工具包:
yum -y groupinstall "Development Tools"
安装Redis/ImageMagick,前者用于缓存也可用于NodeBB的数据库,后者主要用于图像处理:
yum -y install redis ImageMagick
启动Redis并设置开机启动:
systemctl start redis
systemctl enable redis
新建一个源,用于安装Mongodb:
vi /etc/yum.repos.d/mongodb-org-4.0.repo
写入:
[mongodb-org-4.0]
name=MongoDB Repository
baseurl=https://repo.mongodb.org/yum/redhat/$releasever/mongodb-org/4.0/x86_64/
gpgcheck=1
enabled=1
gpgkey=https://www.mongodb.org/static/pgp/server-4.0.asc
然后就可以用yum安装了:
yum -y install mongodb-org
启动mongodb并设置开机启动:
systemctl start mongod
systemctl enable mongod
进入到mongodb的命令行:
mongo
选择:
use nodebb
创建数据库用户并设置密码:
db.createUser( { user: "nodebb", pwd: "设置一个高强度的密码", roles: [ "readWrite" ] } )
添加权限:
db.grantRolesToUser("nodebb",[{ role: "clusterMonitor", db: "admin" }]);
完成之后,键盘组合键Ctrl+D退出来,接下来编辑mongodb数据库的配置文件:
vi /etc/mongod.conf
找到下面的security选项,去掉前面的注释,然后添加下面的内容:
security:
  authorization: enabled
最后重启mongodb数据库,数据库这块就配置完成了:
systemctl restart mongod
现在我们安装Node.js:
curl --silent --location https://rpm.nodesource.com/setup_8.x | sudo bash -
yum -y install nodejs
完成之后,现在我们就可以拉取项目文件了:
cd
git clone -b v1.10.x https://github.com/NodeBB/NodeBB nodebb
进入到项目目录:
cd nodebb
执行安装命令:
./nodebb setup
在这个安装过程中,程序会以交互式的模式让你填写一些配置内容,大概如下:
Q:URL used to access this NodeBB (http://localhost:4567)

A:回车

Q:Please enter a NodeBB secret (xxxxxxxx-xxxx-xxxx-xxxx-xxxxxxxxxxxx)

A:回车

Q:Which database to use (mongo)

A:回车

Q: Host IP or address of your MongoDB instance (127.0.0.1)

A:回车

Q:Host port of your MongoDB instance (27017)

A:回车

Q:MongoDB username nodebb

A:回车

Q:Password of your MongoDB database

A:输入你之前设置的数据库密码

Q:MongoDB database name (nodebb)

A:回车

Q:Administrator username

A:设置管理员用户名

Q:Administrator email address

A:设置管理员邮箱

Q:Password/Confirm Password

A:盲输管理员密码
完成之后,现在我们安装Nginx/Certbot:
yum -y install nginx
yum -y install certbot
使用certbot签发一个域名ssl证书(example.com替换成你们自己的域名):
certbot certonly --standalone -d example.com
接着新建一个Nginx站点配置文件(example.com替换成你们自己的域名):
vi /etc/nginx/conf.d/nodebb.conf
写入:
server {
    listen       80;
    listen       443 ssl http2;
    server_name  example.com www.example.com;
    if ($server_port !~ 443){
        rewrite ^(/.*)$ https://$host$1 permanent;
    }

    ssl_certificate   /etc/letsencrypt/live/example.com/fullchain.pem;
    ssl_certificate_key    /etc/letsencrypt/live/example.com/privkey.pem;
    ssl_protocols TLSv1 TLSv1.1 TLSv1.2;
    ssl_ciphers ECDHE-RSA-AES128-GCM-SHA256:HIGH:!aNULL:!MD5:!RC4:!DHE;
    ssl_prefer_server_ciphers on;
    ssl_session_cache shared:SSL:10m;
    ssl_session_timeout 10m;
    error_page 497  https://$host$request_uri;

location / {
    proxy_set_header X-Real-IP $remote_addr;
    proxy_set_header X-Forwarded-For $proxy_add_x_forwarded_for;
    proxy_set_header X-Forwarded-Proto $scheme;
    proxy_set_header Host $http_host;
    proxy_set_header X-NginX-Proxy true;

    proxy_pass http://127.0.0.1:4567;
    proxy_redirect off;

    proxy_http_version 1.1;
    proxy_set_header Upgrade $http_upgrade;
    proxy_set_header Connection "upgrade";
    }
}
现在启动Nginx:
systemctl start nginx
现在编辑NodeBB的配置文件:
vi config.json
把下图中红框标注的URL地址修改成你们自己的域名:

最后我们启动NodeBB即可:
./nodebb start
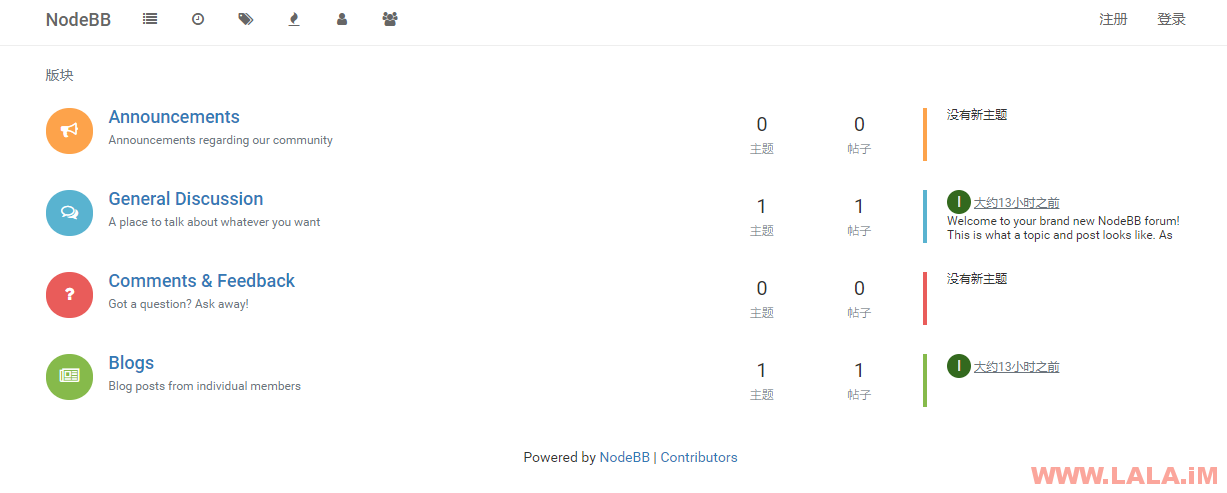
不出意外,现在打开你的站点域名可以访问到这个论坛程序了:

实际上NodeBB给大家配置的这个脚本还有多种用法,可以执行下面的命令查看,对于日常维护非常有用:
./nodebb help
如按照本篇文章安装完成之后,论坛无法访问,一般是防火墙和SELinux问题,可以执行下面的命令关闭:
systemctl stop firewalld.service
systemctl disable firewalld.service
vi /etc/selinux/config
SELINUX=disabled
setenforce 0
不想关防火墙就自己放行80/443/4567/等程序需要用到的端口。
关于数据库备份:
mongodump -d nodebb -u nodebb -p password
备份的数据会保存到当前命令执行目录的dump目录下。


最新评论
5211314
能不能教我 一点不会