Postal也可以说是一个邮件服务器,但更像是一个邮件服务平台,类似:MailGun/SendGrid之类的。
部署之前需要准备两个独立域名,另官方建议服务器的内存至少要有8GB,实际上如果不安装ClamAV的话,2GB就足够了。以下安装过程基于Debian9。
瞎说什么大实话:如果不是有特别的需求,用大厂的邮件服务就行了,花点钱也比自建好。
更新系统:
apt -y update
apt -y dist-upgrade
安装Nginx/Git/RabbitMQ:
apt -y install nginx git curl sudo apt-transport-https software-properties-common
curl -sL https://www.rabbitmq.com/rabbitmq-release-signing-key.asc | sudo apt-key add -
add-apt-repository 'deb http://www.rabbitmq.com/debian/ testing main'
apt -y update
apt -y install rabbitmq-server
安装NodeJS:
apt -y install build-essential
curl -sL https://deb.nodesource.com/setup_11.x | bash -
apt -y install nodejs
安装Ruby2.3:
apt -y install ruby-full
安装MySQL数据库:
apt -y install mariadb-server default-libmysqlclient-dev
安装SpamAssassin:
apt -y install spamassassin
安装CertBot和Nginx插件:
apt -y install certbot python-certbot-nginx
启动各项服务:
systemctl start nginx
systemctl start rabbitmq-server
systemctl start mariadb
systemctl start spamassassin
初始化MySQL:
mysql_secure_installation
向导根据如下配置:
Enter current password for root (enter for none):回车
Set root password? [Y/n] Y
New password: 设置你的Mariadb数据库root密码
Re-enter new password: 重复输入一次密码
Remove anonymous users? [Y/n] Y
Disallow root login remotely? [Y/n] n
Remove test database and access to it? [Y/n] Y
Reload privilege tables now? [Y/n] Y
登录MySQL:
mysql -u root -p
创建用户/数据库并设置权限:
CREATE DATABASE postal CHARSET utf8mb4 COLLATE utf8mb4_unicode_ci;
CREATE USER 'postal'@'127.0.0.1' IDENTIFIED BY '设置用户密码';
GRANT ALL PRIVILEGES ON postal.* TO 'postal'@'127.0.0.1';
GRANT ALL PRIVILEGES ON `postal-%`.* TO 'postal'@'127.0.0.1';
FLUSH PRIVILEGES;
quit
添加rabbitmq的vhost以及用户:
rabbitmqctl add_vhost /postal
rabbitmqctl add_user postal 设置用户密码
rabbitmqctl set_permissions -p /postal postal ".*" ".*" ".*"
创建一个新用户并指定这个用户的根目录为/opt/postal:
useradd -r -m -d /opt/postal -s /bin/bash postal
修改ruby权限:
setcap 'cap_net_bind_service=+ep' /usr/bin/ruby2.3
安装bundler/procodile:
gem install bundler
gem install procodile
拉取项目文件:
sudo -i -u postal mkdir -p /opt/postal/app
sudo -i -u postal wget https://postal.atech.media/packages/stable/latest.tgz -O /opt/postal/app/latest.tgz
sudo -i -u postal tar -xzvf /opt/postal/app/latest.tgz -C /opt/postal/app
把可执行文件创建一个软链接,让其全局可用:
ln -s /opt/postal/app/bin/postal /usr/bin/postal
安装程序所需依赖:
postal bundle /opt/postal/vendor/bundle
生成一个配置文件:
postal initialize-config
编辑配置文件:
nano /opt/postal/config/postal.yml
先暂时改动如下内容,还有一些配置必须等到安装完成之后:
web:
  # The host that the management interface will be available on
  host: mail.koko.cat
  # The protocol that requests to the management interface should happen on
  protocol: https

main_db:
  # Specify the connection details for your MySQL database
  host: 127.0.0.1
  username: postal
  password: 数据库用户密码
  database: postal

message_db:
  # Specify the connection details for your MySQL server that will be house the
  # message databases for mail servers.
  host: 127.0.0.1
  username: postal
  password: 数据库用户密码
  prefix: postal

rabbitmq:
  # Specify the connection details for your RabbitMQ server.
  host: 127.0.0.1
  username: postal
  password: rabbitmq用户密码
  vhost: /postal

dns:
  # Specifies the DNS record that you have configured. Refer to the documentation at
  # https://github.com/atech/postal/wiki/Domains-&-DNS-Configuration for further
  # information about these.
  mx_records:
    - mail.koko.cat
  smtp_server_hostname: mail.koko.cat
  spf_include: spf.mail.koko.cat
  return_path: rp.mail.koko.cat
  route_domain: routes.mail.koko.cat
  track_domain: track.mail.koko.cat
初始化数据库并创建管理员用户:
postal initialize
postal make-user
现在就可以启动postal的服务了:
postal start
新建Nginx配置文件:
nano /etc/nginx/conf.d/postal.conf
先这样配一个没有SSL的反代让CertBot能够识别出站点:
server {
    listen       80;
    server_name  mail.koko.cat;
    root /opt/postal/app/public;

    location / {
       client_max_body_size 50M;
       try_files $uri $uri/index.html $uri.html @puma;
    }

    location /assets {
       add_header Cache-Control max-age=3600;
    }

    location @puma {
        proxy_set_header X-Real-IP  $remote_addr;
        proxy_set_header Host $host;
        proxy_set_header X-Forwarded-For $proxy_add_x_forwarded_for;
        proxy_set_header X-Forwarded-Proto https;
        proxy_pass http://127.0.0.1:5000;
    }
}
然后用CertBot申请SSL证书:
certbot --nginx certonly
证书申请好了之后再把之前配置的文件删除并重新创建:
rm -rf /etc/nginx/conf.d/postal.conf
nano /etc/nginx/conf.d/postal.conf
写入如下配置:
server {
    listen       80;
    listen       443 ssl http2;
    server_name  mail.koko.cat;
    root /opt/postal/app/public;
    if ($server_port !~ 443){
        rewrite ^(/.*)$ https://$host$1 permanent;
    }

    ssl_certificate    /etc/letsencrypt/live/mail.koko.cat/fullchain.pem;
    ssl_certificate_key    /etc/letsencrypt/live/mail.koko.cat/privkey.pem;
    ssl_protocols TLSv1 TLSv1.1 TLSv1.2;
    ssl_ciphers ECDHE-RSA-AES128-GCM-SHA256:HIGH:!aNULL:!MD5:!RC4:!DHE;
    ssl_prefer_server_ciphers on;
    ssl_session_cache shared:SSL:10m;
    ssl_session_timeout 10m;
    error_page 497  https://$host$request_uri;

    location / {
       client_max_body_size 50M;
       try_files $uri $uri/index.html $uri.html @puma;
    }

    location /assets {
       add_header Cache-Control max-age=3600;
    }

    location @puma {
        proxy_set_header X-Real-IP  $remote_addr;
        proxy_set_header Host $host;
        proxy_set_header X-Forwarded-For $proxy_add_x_forwarded_for;
        proxy_set_header X-Forwarded-Proto https;
        proxy_pass http://127.0.0.1:5000;
    }
}
最后重启Nginx:
systemctl restart nginx
这样就配置好了SSL并且证书会通过Certbot自动更新。
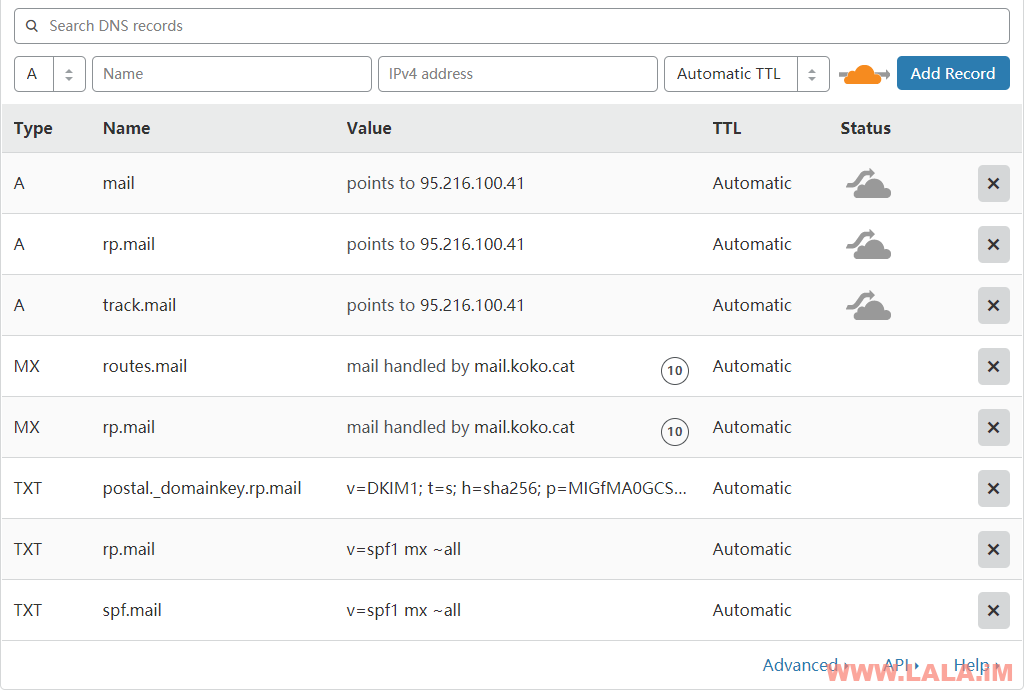
接下来是域名DNS解析的配置,这边我使用CloudFlare,之前说过要准备两个独立的域名,这个koko.cat的域名我拿来当主域名,也就是提供Postal本身访问和一些其他功能的。大概的解析记录是这样的:
其中有一个DKIM的记录,可以通过如下命令获得解析值:
postal default-dkim-record
接下来配置反垃圾邮件/SPAM的功能(可选)如果你觉得没什么必要可以略过。
编辑spamassassin的配置文件:
nano /etc/default/spamassassin
开启spamassassin规则的自动更新:
# If you're using systemd (default for jessie), the ENABLED setting is
# not used. Instead, enable spamd by issuing:
# systemctl enable spamassassin.service
# Change to "1" to enable spamd on systems using sysvinit:
ENABLED=1

# Cronjob
# Set to anything but 0 to enable the cron job to automatically update
# spamassassin's rules on a nightly basis
CRON=1
重启spamassassin:
systemctl restart spamassassin
修改Postal的配置文件:
nano /opt/postal/config/postal.yml
文件的最下面加入:
spamd:
  enabled: true
  host: 127.0.0.1
  port: 783
重启Postal使其生效:
postal restart
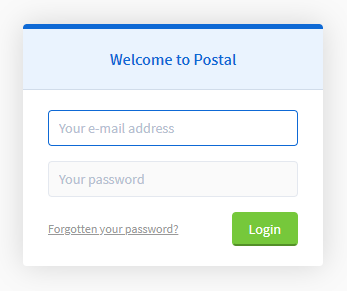
现在访问你的站点,不出意外应该可以访问到Postal的界面:
不要去急着登录使用,现在回到终端内把Postal给停止了:
postal stop
新建一个systemd服务文件:
nano /etc/systemd/system/postal.service
写入:
[Unit]
Description=Postal Mail Platform
After=mysqld.service rabbitmq-server.service
Wants=mysqld.service rabbitmq-server.service

[Service]
ExecStart=/usr/bin/postal start
ExecStop=/usr/bin/postal stop
ExecReload=/usr/bin/postal restart
User=postal
Restart=on-failure
Type=forking

[Install]
WantedBy=mysqld.service rabbitmq-server.service
启动Postal并设置为开机启动:
systemctl enable postal
systemctl start postal
这样做的目的是让Postal可以开机启动,另外使用systemd去管理进程是更为优雅的方式。
现在重新访问并使用你的管理员账号登录进去,第一件事情是创建一个组:
组创建完了之后在你创建的组下面开始创建邮件服务:
注:无论是组还是邮件服务NAME这些东西建议都用英文,用中文可能会有问题。
接下来要添加域名,这个域名就是第二个域名了,这个域名专门用来处理邮件相关的东西。Postal支持添加组域名/邮件服务域名。区别就是:组里面添加的域名可以适用于这个组下面的所有邮件服务,而邮件服务下添加的域名就只支持这一个邮件服务。这边我把域名添加到组里面:
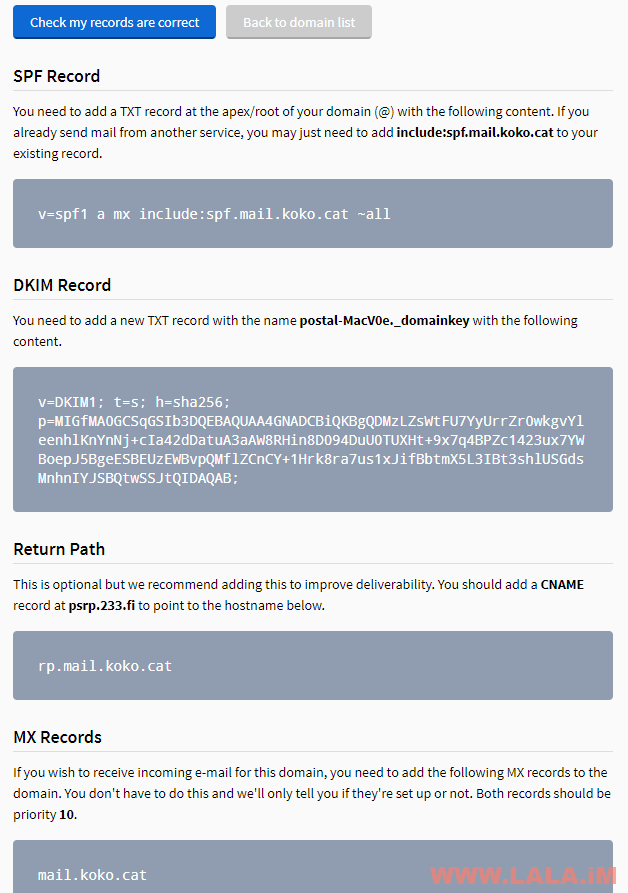
然后按照要求去做解析:
等待解析生效,检查解析记录是否正确,确保都是绿色的勾勾:
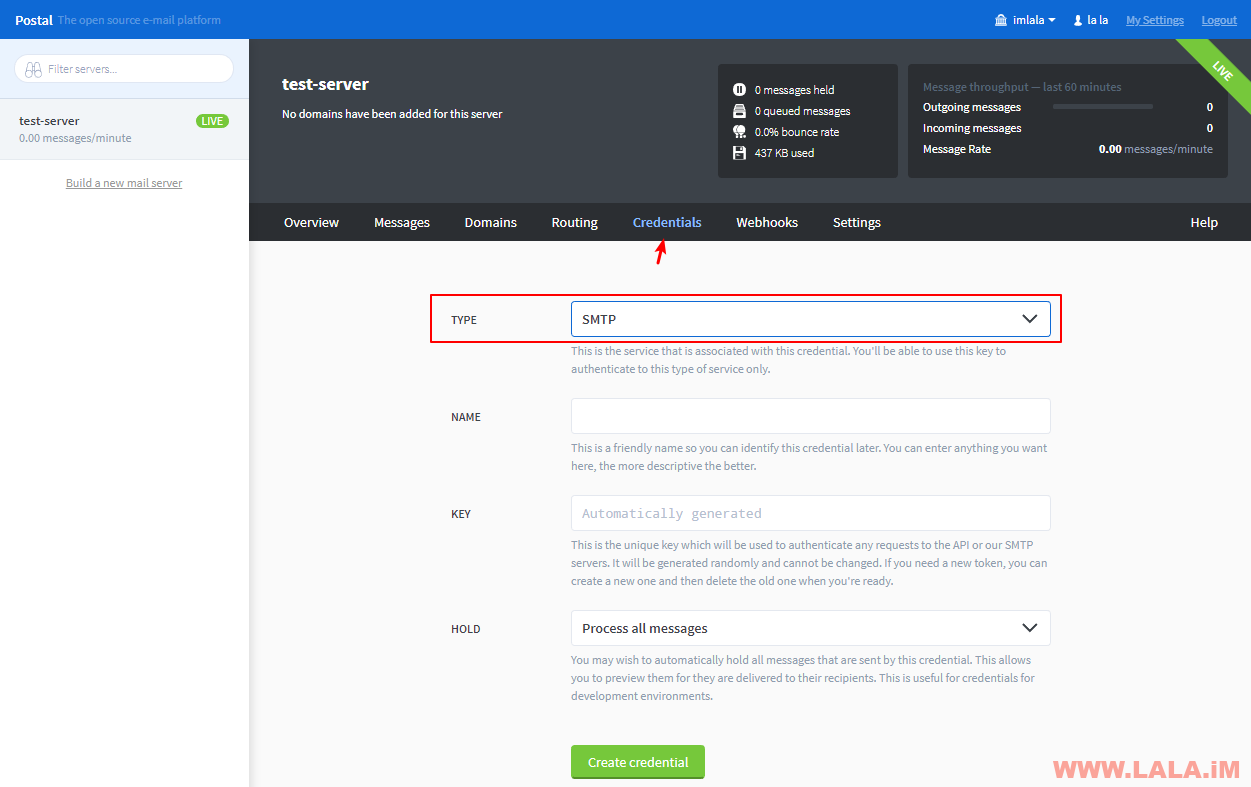
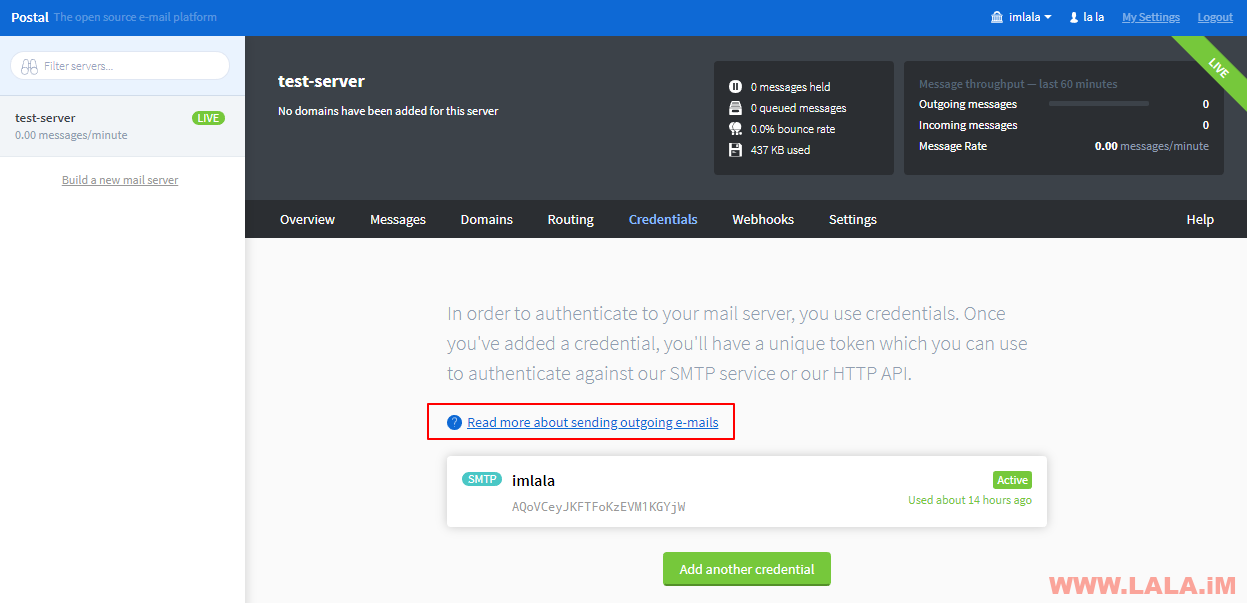
点进去刚创建的邮件服务,Postal支持很多种发信的方式,这边我就使用最常见的SMTP吧,首先点击Credentials创建凭据:
之后回到之前创建的页面,点击红框标注的字段:
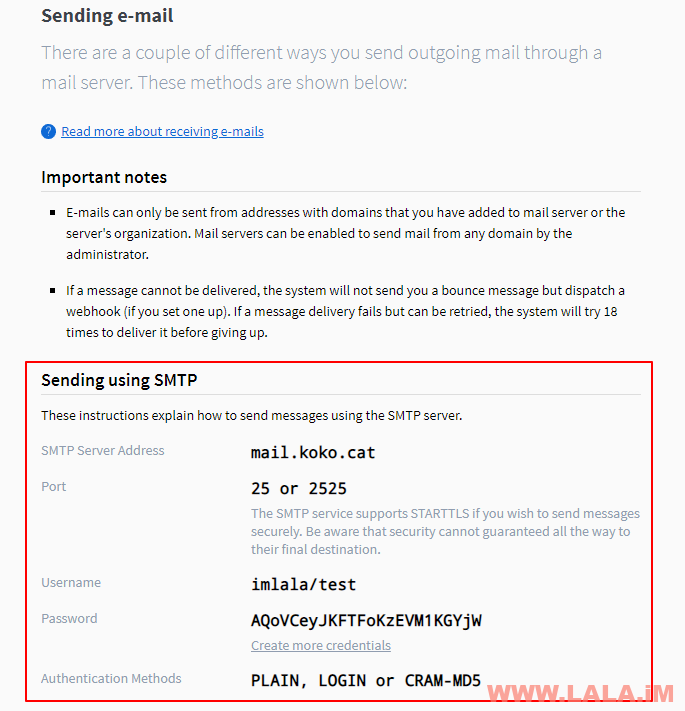
下面会列出你的SMTP登录信息:
我们可以先把这个SMTP配置给Postal自己去使用,让Postal通过这个SMTP发送用户注册确认的邮件或者其他邮件。还是编辑Postal的配置文件:
nano /opt/postal/config/postal.yml
配置如下:
smtp:
  # Specify an SMTP server that can be used to send messages from the Postal management
  # system to users. You can configure this to use a Postal mail server once the
  # your installation has been set up.
  host: 127.0.0.1
  port: 25
  username: imlala/test
  password: AQoVCeyJKFTFoKzEVM1KGYjW
  from_name: Postal
  from_address: [email protected]
需要注意的是from_address后面的邮箱地址必须要是你添加到组/邮件服务内的域名。否则Postal无法验证Sender导致无法发信。
最后重启postal:
systemctl restart postal
现在我们就可以使用这个SMTP服务来发信了,这边我临时搭了一个WordPress,安装了SMTP插件,插件的配置如下:
测试了一下可以正常发信:
理论上任何支持SMTP的程序,都可以使用这个SMTP来发送邮件了。但有一个问题就出来了,邮件是发送出去了,但怎么接收这个邮箱的邮件呢?
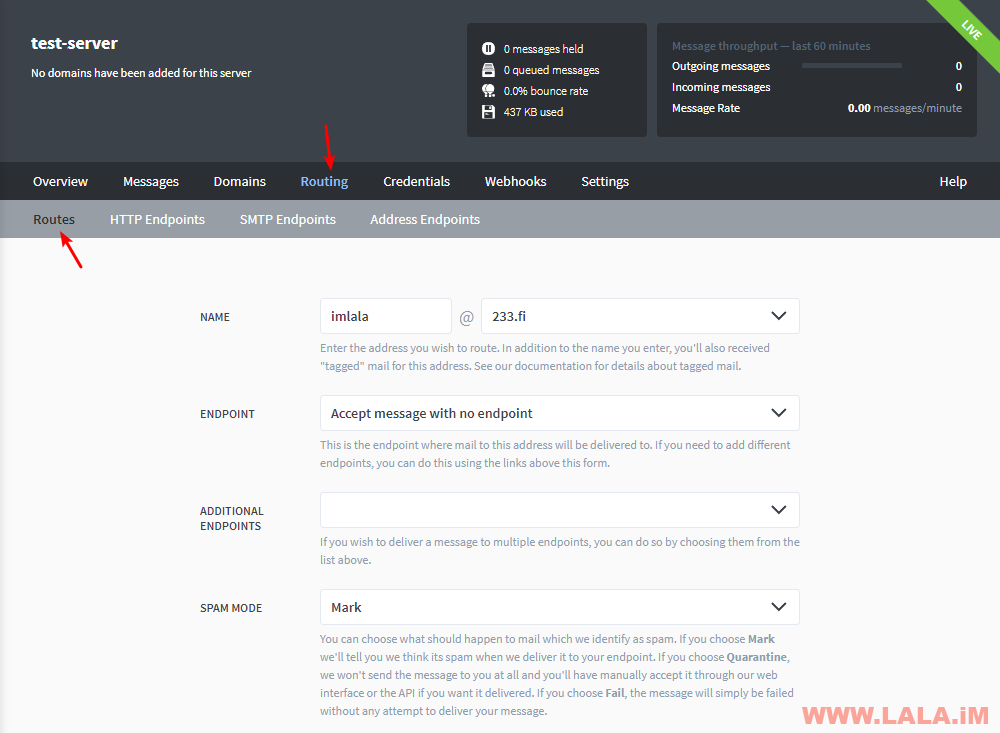
Postal提供了一个Routes的功能,你只需要将From Email Address的地址添加一个Routes就行了。例如我上面用来测试的From Email Address是:[email protected],那么在下面这个界面就可以这样配置:
这样只要有人往这个邮箱发邮件,我都可以接收到:
垃圾箱还是要进的,一直进一直爽,评分就算再高又有什么用¿
参考文献:
https://github.com/atech/postal/wiki/Installation
https://github.com/atech/postal/wiki/Domains-&-DNS-Configuration








最新评论
5211314
能不能教我 一点不会