很久之前我水过一篇CentOS7安装Mastodon的文章,自己也确实玩了大概2-3个月吧,当时是在套路云的1G小鸡上部署的,后来因为内存总是不够要上SSH重启服务,就放弃了。。
最近又想重新搭建一个,当个记录心情/做笔记的工具,正好手上又有一台闲置的2G内存机器,准备长久运行下去了~
在开始之前要做的准备工作:
1.一个独立域名
2.一台内存至少2GB的VPS
3.一个SMTP服务(我使用SendGrid)
更新系统:
apt -y update
apt -y dist-upgrade
添加Node.js/Yarn的软件源:
apt -y install curl build-essential
curl -sL https://deb.nodesource.com/setup_10.x | bash -
curl -sL https://dl.yarnpkg.com/debian/pubkey.gpg | apt-key add -
echo "deb https://dl.yarnpkg.com/debian/ stable main" | tee /etc/apt/sources.list.d/yarn.list
更新源信息,安装全部需要用到的依赖/软件:
apt -y update
apt -y install nodejs yarn imagemagick ffmpeg nginx
redis-server redis-tools postgresql postgresql-contrib
git certbot python-certbot-nginx zlib1g-dev bison
libpq-dev libxml2-dev libxslt1-dev libprotobuf-dev
libssl-dev libyaml-dev libreadline-dev libncurses5-dev
libgdbm-dev libffi-dev libgdbm-dev libidn11-dev libicu-dev
libjemalloc-dev protobuf-compiler pkg-config autoconf
设置Redis连接密码(可选,因为Redis默认只监听在本地,不设置密码也没啥事):
nano /etc/redis/redis.conf
去掉下面的注释,更改foobared为一个高强度的密码:
# requirepass foobared
重启Redis:
systemctl restart redis-server
注:这里建议不要设置Redis密码,Mastodon在setup的时候可能会报错。
PostgreSQL数据库配置调优(可选):
nano /etc/postgresql/11/main/postgresql.conf
这是针对2G内存机器的配置,可以自己对着修改:
# DB Version: 11
# OS Type: linux
# DB Type: web
# Total Memory (RAM): 2 GB
# CPUs num: 1
# Data Storage: ssd

max_connections = 200
shared_buffers = 512MB
effective_cache_size = 1536MB
maintenance_work_mem = 128MB
checkpoint_completion_target = 0.7
wal_buffers = 16MB
default_statistics_target = 100
random_page_cost = 1.1
effective_io_concurrency = 200
work_mem = 1310kB
min_wal_size = 1GB
max_wal_size = 2GB
如果你的机器配置更高,可以自己在下面生成符合你的配置:
https://pgtune.leopard.in.ua
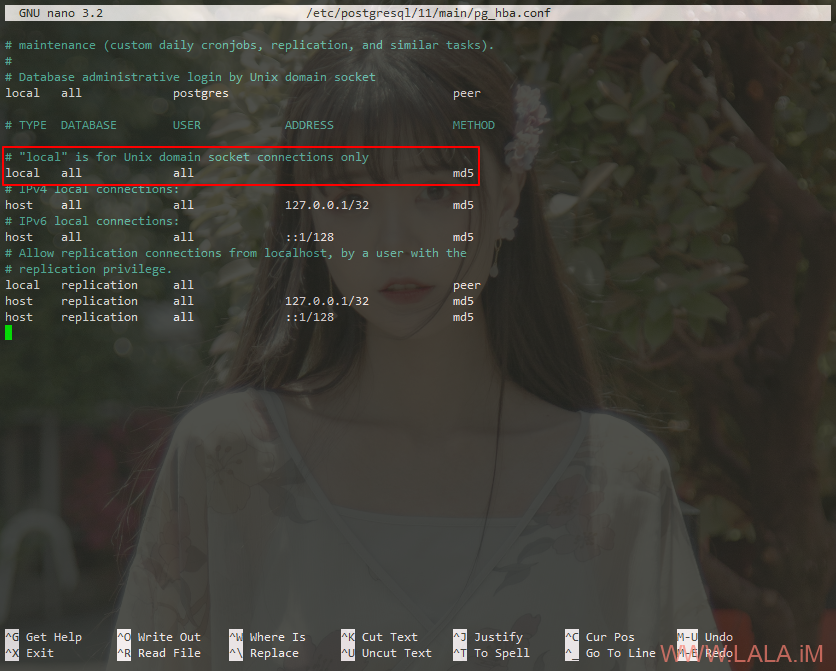
修改PostgreSQL验证方式(可选,PostgreSQL和Redis一样也只监听在本地,空密码不会有安全问题)
nano /etc/postgresql/11/main/pg_hba.conf
修改如图位置的密码验证方式为md5:
重启postgresql:
systemctl restart postgresql
登录到psql内:
sudo -u postgres psql
创建新用户并给予这个用户创建数据库的权限:
CREATE USER mastodon CREATEDB;
之后设置这个用户的密码并退出psql:
password mastodon
q
创建一个新的系统用户:
useradd -m -s /bin/bash -U mastodon
切到这个用户下:
su - mastodon
安装rbenv:
curl -fsSL https://github.com/rbenv/rbenv-installer/raw/master/bin/rbenv-installer | bash
echo 'export PATH="$HOME/.rbenv/bin:$PATH"' >> ~/.bashrc
echo 'eval "$(rbenv init -)"' >> ~/.bashrc
source ~/.bashrc
使用rbenv安装ruby2.6.1:
RUBY_CONFIGURE_OPTS=--with-jemalloc rbenv install 2.6.1
rbenv global 2.6.1
升级gem/安装bundler:
gem update --system
gem install bundler --no-document
拉取项目文件:
git clone https://github.com/tootsuite/mastodon.git live && cd live
git checkout $(git tag -l | grep -v 'rc[0-9]*$' | sort -V | tail -n 1)
安装所需依赖:
bundle install -j$(getconf _NPROCESSORS_ONLN) --deployment --without development test
yarn install --pure-lockfile
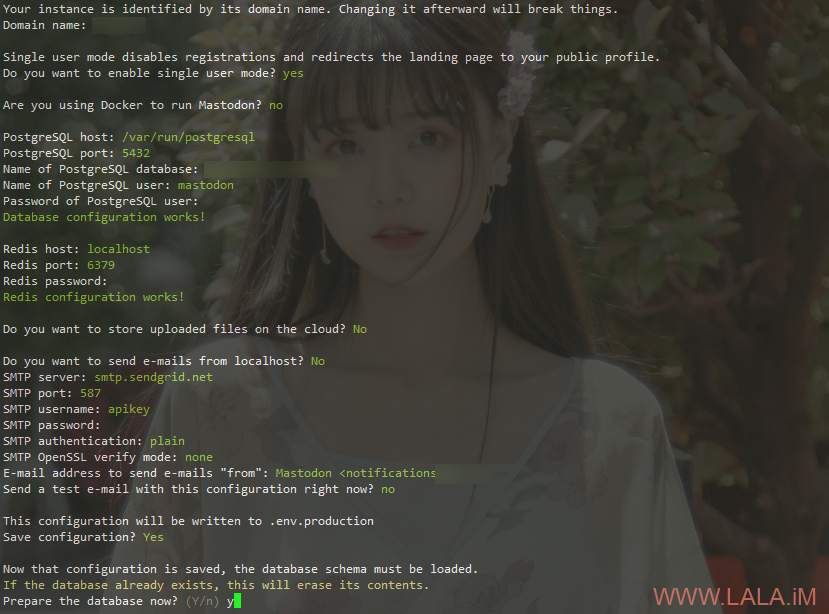
执行下面的命令开始初始化配置:
RAILS_ENV=production bundle exec rake mastodon:setup
1.填写你的域名,根域名或者子域名都可以,不要带http://
2.是否使用单用户模式(这里我是使用的单用户)单用户即关闭注册等功能,首页直接跳转到你的个人页面。
3.是否使用的Docker部署?是个J8,选NO。
4.PGSQL的连接信息,数据库名字随便写,用户名是mastodon,密码是你自己之前设置的。
5.Redis的连接信息,密码为空。(一路敲三个回车就行)
6.是否将文件上传到云端(AWS S3这些)?8好意思,太穷了用不起,存本地!
7.SMTP配置信息,如果你也是和我一样用的sendgrid,那么照着下面的图写就行。
8.确认无误保存当前配置。
9.初始化数据库。
流程如图所示:
数据库能够初始化的话,那么接下来就是构建静态资源了:
构建完成之后按照提示去创建一个管理员账号即可。
全部完成之后退出当前的shell用户:
exit
复制Nginx站点配置文件:
cp /home/mastodon/live/dist/nginx.conf /etc/nginx/conf.d/mastodon.conf
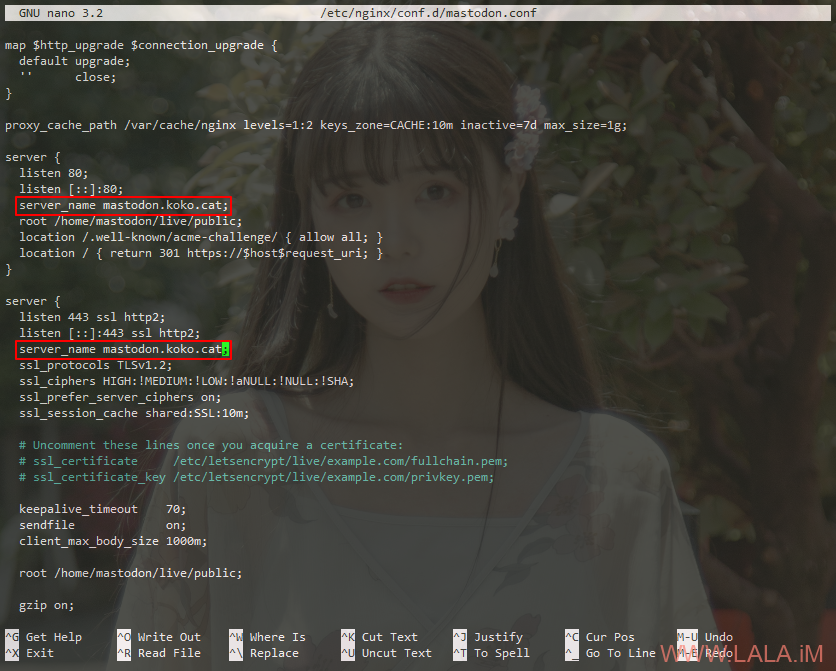
编辑Nginx站点配置文件:
nano /etc/nginx/conf.d/mastodon.conf
修改里面的域名为你自己的即可,其他的不懂就不用改了:
重载Nginx:
systemctl reload nginx
使用certbot签发SSL证书:
certbot --nginx --agree-tos --no-eff-email
将systemd服务文件复制:
cp /home/mastodon/live/dist/mastodon-*.service /etc/systemd/system/
启动Mastodon的所有服务:
systemctl start mastodon-web mastodon-sidekiq mastodon-streaming
设置开机启动:
systemctl enable mastodon-web mastodon-sidekiq mastodon-streaming
顺带把其他需要用到的软件也设置开机启动:
systemctl enable nginx redis-server postgresql
接下来使用elasticsearch配置全文搜索(可选,不过还是建议配置一下,因为Mastodon的搜索功能很弱鸡)
安装JAVA:
apt -y install default-jre
apt -y install apt-transport-https
安装elasticsearch:
wget -qO - https://artifacts.elastic.co/GPG-KEY-elasticsearch | apt-key add -
echo "deb https://artifacts.elastic.co/packages/6.x/apt stable main" | tee -a /etc/apt/sources.list.d/elastic-6.x.list
apt -y update
apt -y install elasticsearch
编辑elasticsearch的jvm配置文件:
nano /etc/elasticsearch/jvm.options
将内存占用修改为512MB(2G内存建议512MB,更高内存自己看着给吧,反正这软件特别占内存,启动失败一般都是内存不够):
-Xms512m
-Xmx512m
使用systemd管理elasticsearch:
systemctl enable elasticsearch
systemctl start elasticsearch
安装中文搜索增强插件:
/usr/share/elasticsearch/bin/elasticsearch-plugin install analysis-smartcn
重启elasticsearch:
systemctl restart elasticsearch
再次切到mastodon用户下:
su - mastodon
编辑ENV:
cd live
nano .env.production
在配置文件内加入:
ES_ENABLED=true
ES_HOST=localhost
ES_PORT=9200
生成索引:
RAILS_ENV=production bundle exec rake chewy:upgrade
回到root用户重启Mastodon所有服务:
systemctl restart mastodon-web
systemctl restart mastodon-sidekiq
systemctl restart mastodon-streaming
然后你可以再次切回mastodon用户同步当前已经发布过的内容(可选):
RAILS_ENV=production bundle exec rake chewy:sync
整个搭建过程就是这些,如果你遇到了什么错误,可以查看对应的日志排错:
journalctl -u mastodon-web -e
journalctl -u mastodon-sidekiq -e
journalctl -u mastodon-streaming -e
清理日志:
journalctl --rotate
journalctl --vacuum-time=1s


最新评论
5211314
能不能教我 一点不会