peertube在前两天的新版本发布中推出了v3版本,此版本最大的亮点就是增加了视频直播的功能。
之前peertube一直在搞众筹,大概是筹到6万欧元就出这个功能,因为我比较期待这个功能,所以隔段时间就看看筹款进展到哪里了,但每次看都是离6万欧还遥遥无期,最后感觉快凉了的时候,debian的团队直接捐了1万欧:
https://bits.debian.org/2020/10/debian-donation-peertube.html
所以这里想说debian还是挺给力的。。
我之前用docker部署过peertube,博客也水过相关的文章,不过后来发现这个程序用docker不太友好,建议还是手动装,这里就不详细说细节问题了,下面是我目前用在生产机器(debian10)上的整个部署步骤。
安装nodejs/yarn:
apt -y update
apt -y install build-essential gnupg curl unzip
curl -sL https://deb.nodesource.com/setup_10.x | bash -
apt -y install nodejs
npm i -g yarn
安装nginx/ffmpeg/postgresql/redis等需要用到的软件包:
apt -y install sudo git python-dev nginx ffmpeg postgresql postgresql-contrib redis-server
启动以及设置nginx/postgresql/redis的开机自启:
systemctl enable --now nginx postgresql redis-server
新建一个名为peertube的用户,注意这个用户的主目录路径最好保持和我下面的一样:
useradd -m -d /var/www/peertube -s /bin/bash peertube
再次提示:如果你把这个用户的主目录做了更改,后面的配置有很多地方都需要修改,如果你不知道后续如何更改这些配置,那么这里建议和我的保持一致。
修改这个用户的密码:
passwd peertube
创建一个postgresql用户和数据库:
sudo -u postgres createuser -P peertube
sudo -u postgres createdb -O peertube -E UTF8 -T template0 peertube_prod
注:第一条命令执行后会提示要你盲输2次密码。如果报什么目录权限问题不用管它,忽视即可。
启用peertube需要用到的扩展:
sudo -u postgres psql -c "CREATE EXTENSION pg_trgm;" peertube_prod
sudo -u postgres psql -c "CREATE EXTENSION unaccent;" peertube_prod
现在直接切到peertube这个用户下面:
su - peertube
准备需要用到的目录/下载解压peertube的源码:
mkdir config storage versions && cd versions
wget https://github.com/Chocobozzz/PeerTube/releases/download/v3.0.0/peertube-v3.0.0.zip
unzip peertube-v3.0.0.zip
ln -s /var/www/peertube/versions/peertube-v3.0.0 ../peertube-latest
安装peertube:
cd ../peertube-latest
yarn install --production --pure-lockfile
复制2份配置文件:
cp config/default.yaml /var/www/peertube/config/default.yaml
cp config/production.yaml.example /var/www/peertube/config/production.yaml
编辑production.yaml:
nano /var/www/peertube/config/production.yaml
这里可以改动的配置很多很杂,我这里就只把必须改的配置说明一下,其他的配置可以在后续的web界面上更改:
webserver:
  https: true
  hostname: 'peertube.imlala.best' # 换成你的域名
  port: 443

database:
  hostname: 'localhost'
  port: 5432
  ssl: false
  suffix: '_prod'
  username: 'peertube'
  password: 'password' # 换成你的数据库用户密码
  pool:
    max: 5

admin:
  email: '[email protected]' # 换成你的邮箱
现在切回root用户:
su - root
复制一份内核调优的配置文件:
cp /var/www/peertube/peertube-latest/support/sysctl.d/30-peertube-tcp.conf /etc/sysctl.d/
应用配置文件内的设置:
sysctl -p /etc/sysctl.d/30-peertube-tcp.conf
这里实际上就是开了个BBR,如果你的机器已经启用了BBR这里可以忽略。
复制一份nginx的站点配置文件:
cp /var/www/peertube/peertube-latest/support/nginx/peertube /etc/nginx/conf.d/peertube.conf
编辑peertube.conf:
nano /etc/nginx/conf.d/peertube.conf
由于这个配置文件里面的内容太多了,我就不全部贴上来了,这里只说一下要改动的地方,首先这里的域名:
server {
  listen 80;
  listen [::]:80;
  server_name peertube.imlala.best; # 换成你的域名
接着删除这段配置:
...
  location /.well-known/acme-challenge/ {
    default_type "text/plain";
    root /var/www/certbot;
  }
然后这里的上游地址和端口改为下面所示的:
upstream backend {
  server 127.0.0.1:9000;
}
这里和之前一样改域名:
server {
  listen 443 ssl http2;
  listen [::]:443 ssl http2;
  server_name peertube.imlala.best; # 换成你的域名
最后把这一大段配置都删掉:
...
  ssl_certificate     /etc/letsencrypt/live/${WEBSERVER_HOST}/fullchain.pem;
  ssl_certificate_key /etc/letsencrypt/live/${WEBSERVER_HOST}/privkey.pem;

  location ^~ '/.well-known/acme-challenge' {
    default_type "text/plain";
    root /var/www/certbot;
  }

  ssl_protocols             TLSv1.2 TLSv1.3;
  ssl_prefer_server_ciphers on;
  ssl_ciphers               ECDHE-ECDSA-AES256-GCM-SHA384:ECDHE-RSA-AES256-GCM-SHA384:ECDHE-ECDSA-CHACHA20-POLY1305:ECDHE-RSA-CHACHA20-POLY1305:ECDHE-ECDSA-AES128-GCM-SHA256:ECDHE-RSA-AES128-GCM-SHA256:ECDHE-ECDSA-AES256-SHA384:ECDHE-RSA-AES256-SHA384:ECDHE-ECDSA-AES128-SHA256:ECDHE-RSA-AES128-SHA256; # add ECDHE-RSA-AES256-SHA if you want compatibility with Android 4
  ssl_session_timeout       1d; # defaults to 5m
  ssl_session_cache         shared:SSL:10m; # estimated to 40k sessions
  ssl_session_tickets       off;
  ssl_stapling              on;
  ssl_stapling_verify       on;
测试nginx的配置是否正常:
nginx -t
正常的话,使用certbot签发ssl证书:
certbot --nginx
复制一份systemd的配置文件:
cp /var/www/peertube/peertube-latest/support/systemd/peertube.service /etc/systemd/system/
启动以及设置peertube开机自启:
systemctl enable --now peertube
查看运行状态确保是Active:
systemctl status peertube
由于peertube默认的管理员密码保存在日志里面,不想看日志的话这里你可以直接使用下面的命令重置一下:
su - peertube
cd peertube-latest && NODE_CONFIG_DIR=/var/www/peertube/config NODE_ENV=production npm run reset-password -- -u root
现在打开你的网站,登录上去,在下图所示的地方可以启用直播功能:
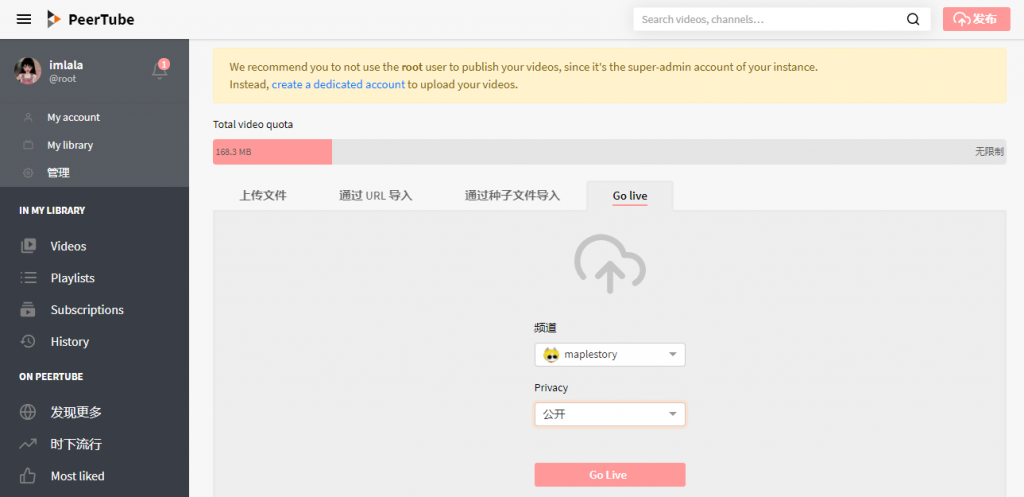
之后在右上角点击发布-Golive,创建直播间:
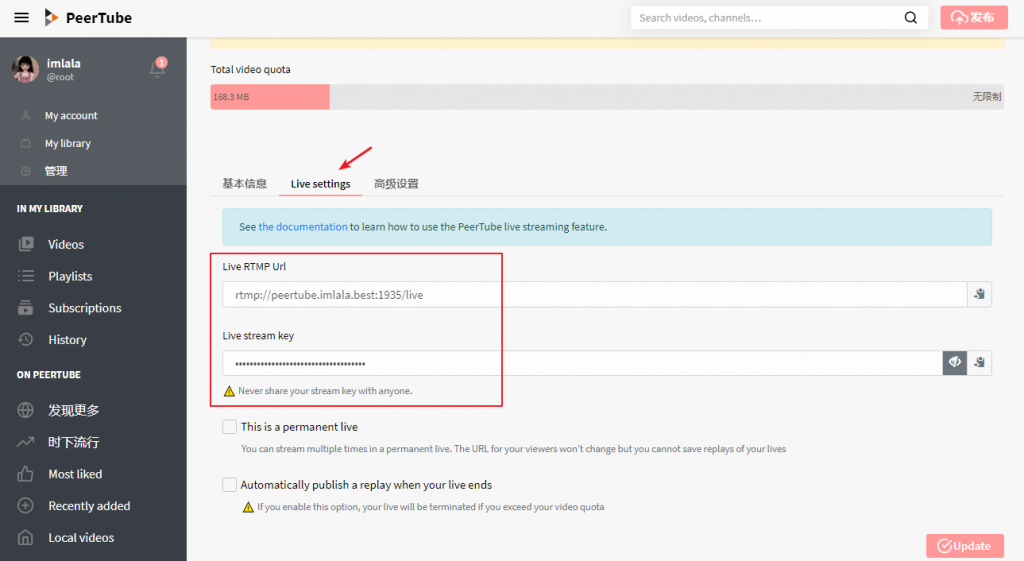
在下图所示的地方可以找到推流地址和密钥:
OBS的设置看这个官方的文档:
https://docs.joinpeertube.org/use-create-upload-video?id=live-examples
更多关于管理员的指南:
https://docs.joinpeertube.org/admin-following-instances


最新评论
5211314
能不能教我 一点不会