2023年10月21日更新,打个小广告:
本人现承接代搭建MapleStory GMS(冒险岛国际服)游戏加速器业务。
如果你是小白不知道如何操作Linux系统,又或者没有时间折腾这些东西只想安心玩游戏,可以联系我有偿帮你搭建。
请注意我给你部署的方法并不是文章内公开的方法,而是更好用更稳定的方法。我可以做出以下几点保证:
1、你的游戏账号不会被IP连坐封号。
2、使用NexonLauncher启动器不会弹出需要验证邮箱的提示。
3、比市面上的游戏加速器玩起来更流畅,你不会感觉到卡顿、延迟。
你可以在这里下单购买:https://shop.meows.lol/MapleStory
目前在线支付只支持PayPal付款,如果你没有PayPal可以工单联系我,我可以发支付宝二维码给你付款。如果你不知道如何在上述网站发工单也可以直接在这篇文章下留言。
在你购买前需要注意以下几点:
1、你可以自备VPS服务器,我只负责帮你在VPS服务器上部署程序。你也可以选择让我准备VPS服务器,即一条龙服务,所有的东西都交给我处理。根据你自身的需求来下单。
2、如果你自备VPS服务器,请确保服务器IP位于北美范围内,例如美国、加拿大。
3、自备VPS服务器一次性收费12美元,如果你使用支付宝付款则按当天的美元兑人民币汇率来计算。
4、一条龙服务一次性收费12美元,每月收费8美元(VPS服务器每月续费)。
5、只支持使用NexonLauncher启动器,如果你使用Steam请事先切换到NexonLauncher启动器。
——————————————————–分隔线——————————————————–
这篇文章应该算是这3篇文章的更新版:
由于udp2raw的faketcp/easyfaketcp伪装模式已经不好用,我这边现在是几分钟就要断一次,再加上旧版shadowsocks也有一些问题,所以这篇文章更新一个新的搭建方法。
udp2raw本身还支持一个icmp伪装模式,经过我的测试这个模式目前非常稳,游戏稳定在线一整天完全没问题,另外之前安装的shadowsocks是通过apt包管理器安装的,版本太旧,存在一些问题,现在改为用snap安装最新版。
此外我还是决定套kcptun来用,经过我的测试kcptun玩起来比tinyfecvpn更流畅,虽然现在冒险岛把大部分职业的技能都改为本地计算cd了,在技能施放这块可以说基本感受不到卡顿了,但是在其他方面,比如进游戏商城,接取任务等方面还是有一些延迟。在这方面kcptun的表现更优秀。
正好今天游戏更新春季版本,故我也更新下梯子的教程。。祝各位新版本肝的愉快,开冲!!!
安装snap/supervisor:
apt -y update
apt -y install wget snapd supervisor
使用snap安装新版shadowsocks:
snap install core
snap install shadowsocks-libev --edge
启动supervisor:
systemctl enable --now supervisor
新建shadowsocks配置文件:
nano /var/snap/shadowsocks-libev/common/etc/shadowsocks-libev/config.json
写入如下配置:
{
    "server":"0.0.0.0",
    "mode":"tcp_and_udp",
    "server_port":8888,
    "local_port":1080,
    "password":"设置你的ss密码",
    "timeout":60,
    "method":"chacha20-ietf-poly1305"
}
新建supervisor配置文件用于守护shadowsocks进程:
nano /etc/supervisor/conf.d/shadowsocks-libev.conf
写入如下配置:
[program:shadowsocks]
priority=1
command=/usr/bin/snap run shadowsocks-libev.ss-server -c /var/snap/shadowsocks-libev/common/etc/shadowsocks-libev/config.json
autostart=true
autorestart=true
redirect_stderr=true
stdout_logfile=/var/log/supervisor/shadowsocks.log
启动shadowsocks:
supervisorctl update
下载安装udp2raw/kcptun:
cd /opt && mkdir -p udp2raw kcptun
cd udp2raw
wget https://github.com/wangyu-/udp2raw-tunnel/releases/download/20200818.0/udp2raw_binaries.tar.gz
tar -xzvf udp2raw_binaries.tar.gz
cd ../kcptun
wget https://github.com/xtaci/kcptun/releases/download/v20210103/kcptun-linux-amd64-20210103.tar.gz
tar -xzvf kcptun-linux-amd64-20210103.tar.gz
新建kcptun配置文件:
nano server-config.json
写入如下配置:
{
"listen": ":7777",
"target": "127.0.0.1:8888",
"key": "设置你的kcptun密码",
"crypt": "salsa20",
"mode": "fast3",
"mtu": 1300,
"sndwnd": 1024,
"rcvwnd": 1024,
"datashard": 2,
"parityshard": 2,
"dscp": 46,
"nocomp": true
}
新建supervisor配置文件用于守护kcptun进程:
nano /etc/supervisor/conf.d/kcptun.conf
写入如下配置:
[program:kcptun]
priority=1
directory=/opt/kcptun
command=/opt/kcptun/server_linux_amd64 -c /opt/kcptun/server-config.json
autostart=true
autorestart=true
redirect_stderr=true
stdout_logfile=/var/log/supervisor/kcptun.log
启动kcptun:
supervisorctl update
新建supervisor配置文件用于守护udp2raw进程:
nano /etc/supervisor/conf.d/udp2raw.conf
写入如下配置:
[program:udp2raw]
priority=1
directory=/opt/udp2raw
command=/opt/udp2raw/udp2raw_amd64 -s -l 0.0.0.0:6666 -r 127.0.0.1:7777 --raw-mode icmp --cipher-mode none -a -k "设置你的udp2raw密码"
autostart=true
autorestart=true
redirect_stderr=true
stdout_logfile=/var/log/supervisor/udp2raw.log
启动udp2raw:
supervisorctl update
确保前面3个服务(shadowsocks/kcptun/udp2raw)都是RUNNING状态:
supervisorctl status
服务端就搭建好了。接下来是客户端的配置。
安装winpcap,参考这里,跨平台版本的udp2raw依赖:
https://github.com/wangyu-/udp2raw-multiplatform/wiki/%E5%AE%89%E8%A3%85pcap%E5%92%8Clibnet
下载udp2raw的跨平台预编译文件:
https://github.com/wangyu-/udp2raw-multiplatform/releases/download/20210111.0/udp2raw_mp_binaries.tar.gz
在powershell里面执行下面的命令启动:
.udp2raw_mp_nolibnet.exe -c -r vpsip:6666 -l 0.0.0.0:5001 --raw-mode icmp --cipher-mode none -k "你的udp2raw密码"
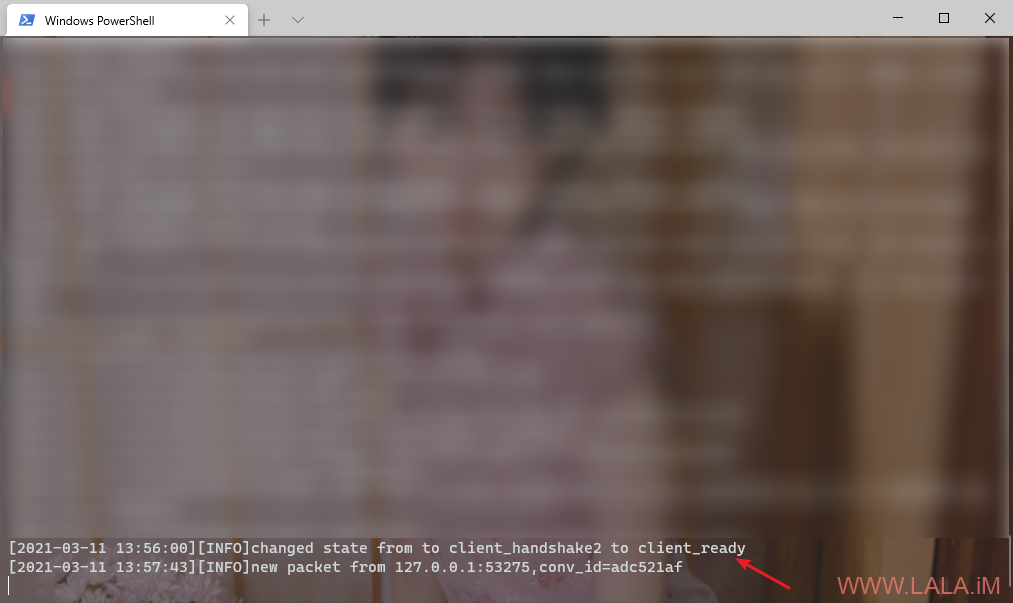
看到有changed state from to client_handshake2 to client_ready字样说明连接成功:
如果没有这一行出现的话,下面这些步骤暂时就不用看了,先排查你之前做的这些服务端配置看看是哪里有问题。
没有问题的话现在下载kcptun的客户端管理工具:
https://github.com/dfdragon/kcptun_gclient/releases/download/v1.1.3/kcptun_gclientv.1.1.3.zip
同时你还需要下载win下的kcptun:
https://github.com/xtaci/kcptun/releases/download/v20210103/kcptun-windows-amd64-20210103.tar.gz
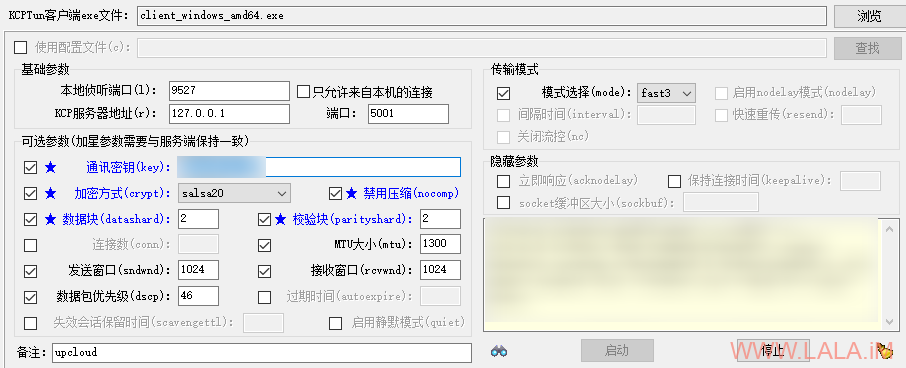
打开kcptun客户端管理工具,在最上方找到KCPTUN客户端exe文件,选中client_windows_amd64.exe
然后按下图添加客户端并填写配置,除了通讯密钥改为你之前设置的kcptun密码外,其他的保持和图片内的配置一致:
之后点击启动即可运行kcptun客户端。
最后下载netch:
https://github.com/NetchX/Netch/releases/download/1.8.1/Netch.7z
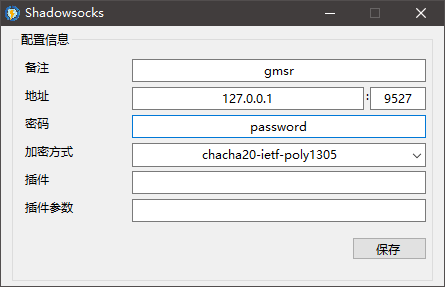
在netch里面添加shadowsocks服务器,除了密码改为你的shadowsocks密码外,其他配置按如图填写:
然后在netch里面点击模式-创建进程模式,扫描你的nexon启动器目录和游戏目录。
例如你的nexon启动器目录:E:Nexon
游戏目录:E:maplestory
两个都需要添加进去。
这里有一个问题是,netch不能完全代理nexon启动器,会导致你的账号无法正常登录。曲线救国的办法有2个:
1.在netch里面添加你的默认浏览器目录,让netch直接代理你的浏览器,然后选择用第三方登录,就是登录界面右边的google/apple登录。此时nexon启动器会调用你的默认浏览器打开第三方登录界面,登录即可。
2.再额外开一个代理工具,比如v2rayN,等到nexon启动器的登录界面加载出来后,随便启用一个代理,用第三方登录即可。(我一般用这个方法)


最新评论
5211314
能不能教我 一点不会