摘自项目README:
Xboard基于V2board 二次开发,增加了以下特性:
升级Laravel10
适配Laravels (提升至10+倍并发)
适配Webman (比laravels快50%左右)
修改配置从数据库中获取
支持Docker部署、分布式部署
支持根据用户IP归属地来下发订阅
增加Hy2支持
增加sing-box下发
支持直接从cloudflare获取访问者真实IP
支持根据客户端版本自动下发新协议
支持线路筛选(订阅地址后面增加 &filter=香港|美国)
支持Sqlite安装(代替Mysql,自用用户福音)
使用Vue3 + TypeScript + NaiveUI + Unocss + Pinia重构用户前端
修复大量BUG
项目地址:https://github.com/cedar2025/Xboard
配套后端:https://github.com/cedar2025/hysteria
本文使用Debian12,安装Nginx、Mariadb、Redis、Certbot:
apt -y update
apt -y install nginx python3-certbot-nginx mariadb-server redis-server
安装PHP8.1:
apt -y install curl apt-transport-https ca-certificates lsb-release
curl -sSLo /usr/share/keyrings/deb.sury.org-php.gpg https://packages.sury.org/php/apt.gpg
echo "deb [signed-by=/usr/share/keyrings/deb.sury.org-php.gpg] https://packages.sury.org/php/ $(lsb_release -sc) main" > /etc/apt/sources.list.d/php.list
apt -y update
apt -y install php8.1-common php8.1-cli
php8.1-gd php8.1-mysql php8.1-mbstring
php8.1-curl php8.1-xml php8.1-xmlrpc
php8.1-zip php8.1-intl php8.1-bz2
php8.1-bcmath php8.1-redis php8.1-swoole
如果你的系统之前安装过别的php版本,可以使用下面的命令切换到8.1:
update-alternatives --config php
安装Composer:
curl -sS https://getcomposer.org/installer | php -- --install-dir=/usr/local/bin --filename=composer
配置Mariadb数据库:
mysql_secure_installation
登录Mariadb数据库:
mysql -u root -p
创建数据库和用户:
CREATE DATABASE xboard CHARACTER SET utf8mb4 COLLATE utf8mb4_unicode_ci;
GRANT ALL PRIVILEGES ON xboard.* TO xboard@localhost IDENTIFIED BY 'password';
FLUSH PRIVILEGES;
quit
获取Xboard的源码:
cd /var/www
git clone https://github.com/cedar2025/Xboard.git xboard
cd xboard/
安装依赖:
composer install
安装Xboard:
php artisan xboard:install
修改目录所有者:
cd ..
chown -R www-data:www-data xboard/
添加计划任务:
crontab -u www-data -e
写入如下配置:
* * * * * php /var/www/xboard/artisan schedule:run >> /dev/null 2>&1
新建队列服务:
nano /etc/systemd/system/xboard-horizon.service
写入如下配置:
[Unit]
Description=Laravel Horizon Queue Manager
After=network.target

[Service]
user=www-data
ExecStart=/usr/bin/php /var/www/xboard/artisan horizon
Restart=on-failure

[Install]
WantedBy=multi-user.target
启动并设置开机自启:
systemctl enable --now xboard-horizon
找到当前正在使用的PHP.INI配置文件:
php --ini
复制一份:
cp /etc/php/8.1/cli/php.ini /etc/php/8.1/cli/webman-php.ini
编辑:
nano /etc/php/8.1/cli/webman-php.ini
默认情况下disable_functions后面是空的,将其修改为如下配置:
disable_functions = header,header_remove,headers_sent,http_response_code,setcookie,session_create_id,session_id,session_name,session_save_path,session_status,session_start,session_write_close,session_regenerate_id,set_time_limit
新建webman服务:
nano /etc/systemd/system/xboard-webman.service
写入如下配置:
[Unit]
Description=Xboard Webman Services
After=network.target

[Service]
User=www-data
WorkingDirectory=/var/www/xboard
ExecStart=/usr/bin/php -c /etc/php/8.1/cli/webman-php.ini webman.php start
ExecReload=/usr/bin/php -c /etc/php/8.1/cli/webman-php.ini webman.php reload
ExecStop=/usr/bin/php -c /etc/php/8.1/cli/webman-php.ini webman.php stop
Restart=on-failure
SyslogLevel=err

[Install]
WantedBy=multi-user.target
启动并设置开机自启:
systemctl enable --now xboard-webman
新建nginx站点配置文件:
nano /etc/nginx/sites-available/xboard
写入如下配置:
server {
    listen      80;
    server_name xboard.example.com;
    root        /var/www/xboard/public;
    index       index.html index.php;
    client_max_body_size 0;

    location ~* .(jpg|jpeg|png|gif|js|css|svg|woff2|woff|ttf|eot|wasm|json|ico)$ {
    }

    location ~ .* {
        proxy_pass http://127.0.0.1:7010;
        proxy_http_version 1.1;
        proxy_set_header Connection "";
        proxy_set_header X-Real-IP $remote_addr;
        proxy_set_header X-Real-PORT $remote_port;
        proxy_set_header X-Forwarded-For $proxy_add_x_forwarded_for;
        proxy_set_header Host $http_host;
        proxy_set_header Scheme $scheme;
        proxy_set_header Server-Protocol $server_protocol;
        proxy_set_header Server-Name $server_name;
        proxy_set_header Server-Addr $server_addr;
        proxy_set_header Server-Port $server_port;
    }

    location ~ /.ht {
        deny all;
    }
}
启用站点:
ln -s /etc/nginx/sites-available/xboard /etc/nginx/sites-enabled/xboard
签发SSL证书:
certbot --nginx
登录管理后台,配置站点域名:
配置通讯密钥(apikey):
添加一个权限组:
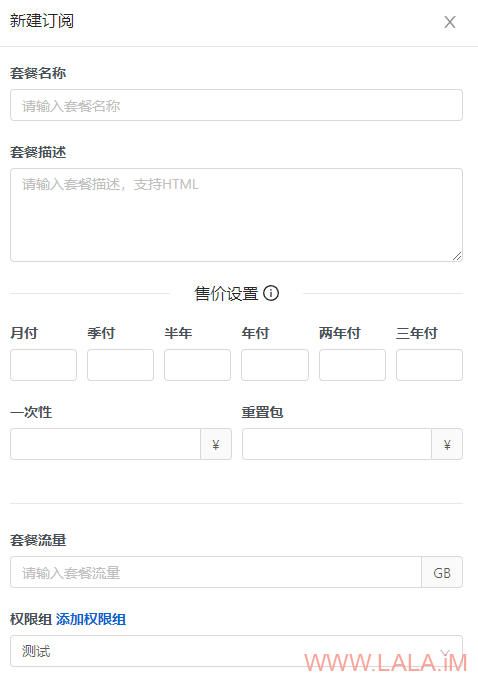
添加一个订阅,指定刚才的权限组:
转到用户前台,购买刚才创建的订阅,方便接下来后端的安装与测试:
准备一个域名,解析到后端节点服务器,本文示例:xbhy2.example.com
80端口不能被占用,Certbot申请证书需要用到。
系统Debian12,首先安装需要用到的包:
apt -y update
apt -y install curl git python3 certbot
安装Golang:
curl -L https://go.dev/dl/go1.21.7.linux-amd64.tar.gz -o go1.21.7.linux-amd64.tar.gz
tar -C /usr/local -xzf go1.21.7.linux-amd64.tar.gz
echo 'export PATH=$PATH:/usr/local/go/bin' > /etc/profile.d/golang.sh
source /etc/profile.d/golang.sh
获取后端源码:
git clone https://github.com/cedar2025/hysteria.git
cd hysteria/
编译:
python3 hyperbole.py build -r
完成后build目录内就是可用的二进制文件了,复制一份:
cp build/hysteria-linux-amd64 /usr/local/bin
新建配置文件:
mkdir -p /etc/hysteria && nano /etc/hysteria/config.yaml
写入如下配置:
v2board:
  apiHost: https://xboard.example.com // Xboard面板地址
  apiKey: panelkey // Xboard面板内设置的通讯密钥
  nodeID: 1 // Xboard面板内的节点ID
tls:
  type: tls
  cert: /etc/letsencrypt/live/xbhy2.example.com/fullchain.pem // Certbot申请的证书
  key: /etc/letsencrypt/live/xbhy2.example.com/privkey.pem // Certbot申请的证书私钥
auth:
  type: v2board
trafficStats:
  listen: 127.0.0.1:7653
acl:
  inline:
    - reject(10.0.0.0/8)
    - reject(172.16.0.0/12)
    - reject(192.168.0.0/16)
    - reject(127.0.0.0/8)
    - reject(fc00::/7)
申请SSL证书:
certbot certonly
新建Systemd服务:
nano /etc/systemd/system/hysteria-server.service
写入如下配置:
[Unit]
Description=Hysteria Server
After=network.target

[Service]
Type=simple
WorkingDirectory=~
ExecStart=/usr/local/bin/hysteria-linux-amd64 server -c /etc/hysteria/config.yaml
Environment=HYSTERIA_LOG_LEVEL=info
CapabilityBoundingSet=CAP_NET_ADMIN CAP_NET_BIND_SERVICE CAP_NET_RAW
AmbientCapabilities=CAP_NET_ADMIN CAP_NET_BIND_SERVICE CAP_NET_RAW
NoNewPrivileges=true

[Install]
WantedBy=multi-user.target
启动并设置开机自启:
systemctl enable --now hysteria-server
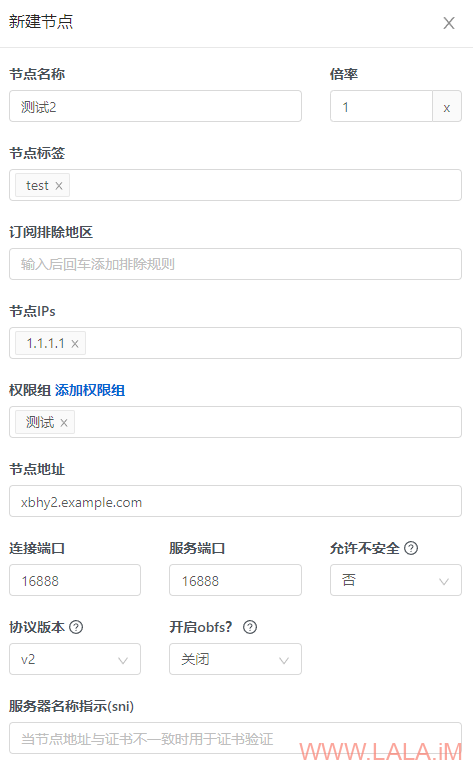
转到Xboard后台添加节点,节点IP填服务器的公网IP、节点地址填写域名、连接端口和服务端口保持一致、协议版本选择v2:
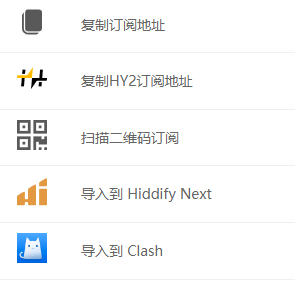
转到用户前台,可以看到订阅的方式:
根据你的客户端选择合适的订阅方式,例如iOS小火箭可以直接扫二维码,这里就不多说了。
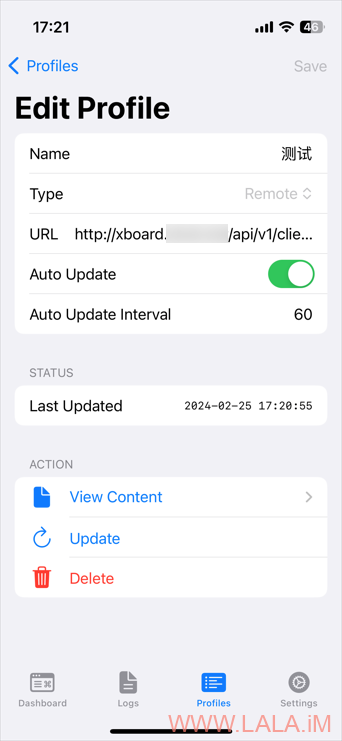
Xboard的一个亮点是支持sing-box订阅下发,这里演示下iOS具体的操作步骤。
复制Xboard提供的订阅地址,然后在SFI里面添加新的Profile,Type选择Remote,在URL里面粘贴刚才复制的订阅地址即可:
Windows的话推荐使用clash-verge-rev:https://github.com/clash-verge-rev/clash-verge-rev/releases






最新评论
5211314
能不能教我 一点不会